Sunday, May 27, 2012
Sunday, May 20, 2012
Friday, May 18, 2012
FUN FRIDAY - More Doodle Fun!
Hi folks..... if you saw my last post
and even had a go at these fabulous Doodle Flowers...
you're going to LOVE these.
Once again... a step-by-step guide to creating your own
Doodles....this time it's leaves!
YOU WILL NEED:
1 dine line pigment pen
Some water based brush felt pens
and a water brush
First draw an outline of a leaf...
Then draw around the outline.....
Fill the inner leaf with a dot and dash pattern... vary it a little
Between the leaf and the outside line.... draw a loop pattern...
the secret is not to go too slow
and not to take as much care as you may think....
That's the drawing done!... you can of course
add more lines around the veins if you want.
Now choose some colours....These are the 3 I picked.....
Roughly go around the edges with the darker colour.....
Then add the lighter shade to the inner part of the leaf
I've added the light green in the middle for light
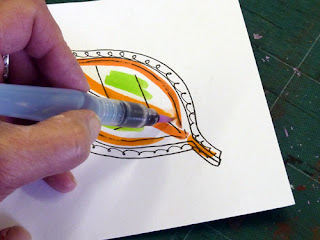
Then with a water brush....squeeze a little water onto the felt pen edges
Keep going .....
Working towards the middle....
The secret is to work from dark to light...
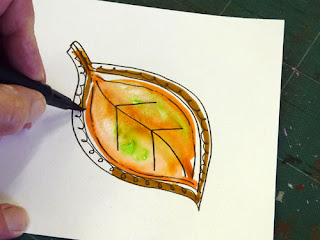
Rather than leave the edges white I picked up a brown
and went around the edge with colour....
Again.... pick up the water brush and flood with water.
Don't get it too wet..... you can always add more,
but taking the water away leaves the colours all pastel and washed out
TA DAAAAA! Here we have it..... your finished leaf!
You can always add more colour if you wish.
Little gaps of white make your painting sparkle....
AND... I couldn't resist printing a load out and cutting them up
They will look great on cards, journals
and a variety of other paper crafts!
I hope you have a go at these Doodles.
Don't get too hung up on perfection...
remember they are meant to be fun
and they are only Doodles after all.
Try other leaf shapes....
and please, if you do have a go....
leave me a comment and share your link
in the comments list below.
Facebookers.... remember..... not everyone is on Facebook.... YET!
Happy FUN FRIDAY!
Have a wonderful weekend xxx
This post is brought to you by Sue Simpson
aka - Sue 'Pixie sue' Simpson :-)
Tuesday, May 15, 2012
Want to draw and paint some Doodle Leaves????
Did you enjoy and try the Doodle Flowers
9 easy steps t Doodle Flowers!
be sure to check back this Friday where we will have more fun... this time with leaves!
AND... this time we will learn how to paint them too.!
My way... the easy way.....
So... get your kit ready to rumble.....
YOU WILL NEED:
A fine line, permanent pen in BLACK
Some water based brush pens
And a water brush.
If you don't have a water brush you can simply used a fat, round ended brush and some clean water.... but water brushes come with their own reservoir and I find them so convenient.... for a few pounds you can have a brush and water pot at your finger tips wherever you are!
OK.... see you Friday.... until then.... happy creating! :o)
Sunday, May 13, 2012
Wednesday, May 09, 2012
My NEW LOOK Websites!
At last.... after many hours and sleepless nights... I've finally completed at least the template for the more contemporary look website for 'Inspired by Script'!
As some of you know I also own 'North Yorkshire Weddings' which was designed and named especially to separate my usually Calligraphy and Lettering Art from the Wedding Stationery side of my business. This decision was made to enable Brides and Grooms to brows purely the wedding side without distractions.
When the Wedding Stationery came all under one roof and was lumped in with my Lettering Art and Personalised gifts there was a tendency for it to get lost.... So, North Yorkshire Weddings was born.
Then, as time went on I felt that the 2 sites, both looking quite different had lost their way somehow and I didn't really know how to bring them together.... in a 'Branded' kind of way. To all intents and purposes, one would think they were looking at 2 different companies.
I'm about to be featured on a Wedding CD, due out in Autumn and it's only when the copyrighter send me a proof of my advert, that I realised how outdated and drab it looked. A new colour scheme, something more contemporary and fresh was called for....so I changed the template. Only when I changed the template, did the light bulb go on... and I decided to copy the template for both sites! They will be different in their content, but there will be no doubt that I am one and the same person and company.
And here they are....if you haven't clicked on the links yet....please take a look and let me know what you think?
For Calligraphy, Lettering Art and Personalised gifts:
Inspired by Script
For Wedding Stationery and all printed accessories:
North Yorkshire weddings
As anyone who has ever built an e-commerce site knows.... building it is the easy part.... listing is something else!
Photos have to be taken, downloaded, manipulated, re-sized, saved and resized again. Then comes the listing. Everything has to have a unique code, a mini description and then fuller description. Prices have to be entered as well as weighing and postage costs. The picture entered and then finally publishing.
So... apologies for the slow growth on these sites. Listing is a slow process and all this has to be done while running the studio, meeting with brides and completing their work too.
The sites show only a small selection and offer a taster of what is on offer at the studio in Northallerton, so if you are local, please pop in..... it's always good to meet face to face.
In the meantime, oif there's anything I can help you with....get in touch, either by phone or email and I'll do my very best to help! :o)
I'll be back soon with regular updates!
Sunday, May 06, 2012
Friday, May 04, 2012
FUN FRIDAY - 9 VERY easy steps to draw Doodle Flowers
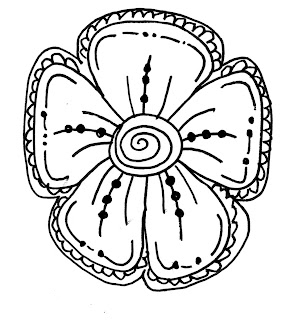
Drawing a Doodle Flower is easy!
This 9 step process will have you drawing Doodle Flowers in no time.
This 9 step process will have you drawing Doodle Flowers in no time.
ALL YOU NEED IS:
A fine line waterproof pen
and some good quality cartridge paper.
and some good quality cartridge paper.
STEP 1
Draw a circle or an oval
STEP 2
Draw a spiral in the centre
STEP 3
Draw 5 spider legs coming from the round shape
STEP 4
Join the lines up to make petals
 |
STEP 5
(You are half way there
to drawing a Doodle Flower!
From the centre draw 3 lines and
on the centre line draw 3 dots
STEP 6
Draw a shading line on the
corners of each petal.
STEP 7
Draw a line around the whole of the flower shape
STEP 8
Use a squiggle pattern to fill in the outline
STEP 9
Join up the shading lines at the top
of each petal with lines or dots.
There you have it!
That's all there is to it!
Your Doodle Flower is complete!
Just add some CRAZY colour!
NOW: Using the same formula,
Your Doodle Flower is complete!
Just add some CRAZY colour!
NOW: Using the same formula,
go and make some of your own.
Try drawing some leaves as well!
Changed the shape of the petals....
or add some more.
Get the kids involved and above all else,
HAVE FUN!
Next week on Friday Fun Day
I'll show you how to add some colour,
my way!
All you will need
are some WATER BASED BRUSH PENS
(Non-waterproof, non-pigmented)
and one of those WATER BRUSHES
will come in handy too! :o)
Oh.... and one last little thing...
Don't forget to share this post
by clicking on the share buttons below
Sharing is Caring!
Oh.... and one last little thing...
Don't forget to share this post
by clicking on the share buttons below
Sharing is Caring!
Thursday, May 03, 2012
Are you ready???? For some Doodle Fun?
Are you ready???? For some Doodle Fun?
I received such a response after my blog posting about
I decided I'd show you just how east it is!
Check in tomorrow.
Have some good quality cartridge paper handy,
and some 'Permanent' fine line pens!
And BE WARNED - They ARE ADDICTIVE!
So a pot of lovely coffee on the stove may be a good idea :o)
See you tomorrow xxx
Tuesday, May 01, 2012
You have to laugh!l
Steve and I have just been talking about getting severely reprimanded from websites. I was told off and my listing removed from eBay, some time ago, for violating their rules and almost got banned for life... well until I used another email address and opened a new account.
Now, he's just had a similar email.... from Flickr! And if he doesn't comply he will be removed forthwith.! He's even been supplied with a case number!
What is this heinous crime you may ask?
Were we selling porn or taking naughty photos of ourselves to share to the outside world?
(Yes, I know all about readers wives, but have very little ... or should I say NO interest in taking part in any of that!)...
No the crime is seems is much more serious than that....
We actually made reference to..........
OUR WEB SITES! ... Good grief, the world will surely end won't it, if some poor so and so is directed to our website!
Thankfully Blogger is much more forgiving!
It made me remember, when I had my very first computer.... running on DOS!
I was considered a techie head for installing the Internet... either that or it was 'assumed' that I wanted to look at dodgy sites..... sadly no, the only thing I wanted it for was to connect with other Calligraphers around the world... which I did! and we are still friends now...
However I digress!
Yes I reminisced with Steve about the first time I received an email warning me that I had performed an 'Illeagal operation!'
terrified the net police (I had heard about them) would come knocking and criminalise an otherwise innocent person... I replied and apologised from the bottom of my heart...saying I was only new to this and no-one else knew how to use it.
I was fraught when the email bounced back as undeliverable!
Fortunately I never heard from the 'Net Police', no-one came knocking and my 'illegal opperations' became fewer and fewer.
Question: Whatever happened to that white cross in the red circle that used to often flash with a loud BUMP on the screen?
Sunday, April 29, 2012
Friday, April 27, 2012
FUN FRIDAY! - Doodle Inspiration
I seem to have somehow
caught a bug!....
a flippin' great dose of
DOODLE BUGS that is!
Oooooer! I forgot how therapeutic these were!
And with a little bit of colour here......
And a little bit there.....
they can look amazing!
Check out those quirky heart flowers!
Painting with colour
makes all the difference....
and brings it all to life!
Doodles are easy, quick and
a fun and funky way
to wind down and relax...
Plus you can use them for all sorts of other crafts,
from card making to scrap booking.
Try it.... once you start you can't stop,
and the ideas will flow and grow.
Happy creating.
Any questions?
please leave a comment :o)
Labels:
Be Inspired,
FUN FRIDAY,
Power Doodles,
Tips amp; Techniques
Thursday, April 26, 2012
What's a strawberry got to do with anything?
A strawberry......
for no reason :o)
Just a little teaser,
Just a little teaser,
of things to come....
Inspiration comes in many guises.
Inspiration comes in many guises.
Tomorrow......
I hope to inspire you too!
Wednesday, April 25, 2012
Painting Collage Doodles - Autumn Leaves
I don't know what got me thinking of Autumn,
when I love and look forward to Summer so much.
Perhaps it was the colours in the scarf I was wearing
But then someone shared this on Facebook.
Which sent me to this Pinterest Page
and I was inspired to pick up those pens
and water brush, and have a little play.
As I've been telling myself for a long time,
I really must get round to making an Art Journal,
I thought I would at least draw and paint
some Doodle Leaves
to perhaps add to the front.
Then I got to thinking
that I could, if I made a few of these
and cut them out....
make some sort of collage.
for the front.....
And here's the little pile I created...
I think they'll look fab on a book....
Then I took the design and added to it....
My art Journal seemed appropriate
and encouraging,
at least it's a start......
And of course.... ever the eternal caution filled Pixie,
I scanned and printed a couple out, just in case...
If I don't use them,
I'm sure I can find someone else that will
And I'll probably add some of those loose leaves
to make the design even bigger
Tuesday, April 24, 2012
Proving that 3 into 1 does go! ... Confessions of a technophobe!
3 machines:
1 Prints,1 foils,and 1 cuts.
Sometimes I even make myself laugh! I wanted to write this blog post, about experimenting with the machines at the studio and show you how my mind works sometimes.
It was only after I loaded the pictures in order, that I remembered this post about resisting change and technology and how I do everything in my power to avoid it like the plague. In fact, I'm one of those that is the last to get anything, not the first... and usually this is because I HAVE to have it in order for things to still work.
After seeing that Blogger was changing to the 'NEW BLOGGER' in April and fearing I would be the last to leave 'Old Blogger' and wouldn't have a clue how to post, add pictures etc. I was extra brave a couple of weeks ago and bit the bullet!
Then Google kept telling me to upgrade to Google Chrome.... again I resisted, until my hand was forced.
After being told repeatedly that Facebook was going to change whether we like it or not, I clenched my bum cheeks as I installed, never to be able to return, to the NEW Facebook timeline.
Now all this above may not seem like a big deal, but as a self confessed technophobe who hates change and prefers the comfortable and stable these day, it was one hell of a big deal.
Which brings me to this..... I wanted to blog about my idea of bringing 3 machines I employ on minimum wage, to make one complete thing. These 3 machines are not really designed to work together but the more I did with them the more I wanted to push boundaries. Now that's something I DO like doing.....taking things to their ultimate capacity and beyond....just to see if the techie heads have got the specification sheets right, you understand.
Anyway....it was then and only then I realised that actually I am more a techie headed geek than I thought I was.
Are you with me so far?
I have a laser printer, a foiler and a plotter (which cuts vinyl and card).... 3 machines, bought for very different reasons. Each I have used in their own right..... but what could I do if I worked all 3 together? I had an end product in mind.... I just had to work backwards and see if I could get it to work.
Here's what I did.....
First I used the plotter software adding my design....
. then printed it off......
Then I foiled it....
This is what the sheet looked like.
Nothing special....it's how I print and foil all my Wedding Stationery
Then back to the plotter software,
in the hope that I had told the plotter where to cut around my design....
It didn't work....
Somehow the trace facility is still open to error
and there has to be a bit of technical knowledge
behind the thinking.....
A few buttons later and a quick test cut, showed that this time it did work!
Here;s a close up so you can see that I have left a border around the image,
I think cutting on the lines would have made for a long cutting time....
I'm fairly pleased with them and as usual can't resist folding the wings up!
Butterflies just don't look right with flattened wings.
Learning all this has made me feel like an expert......
But the best laugh????
I haven't the foggiest idea how I got it to work!
I guess I'm not as clever as I think I am!!!
So... back to the drawing board :o)
Subscribe to:
Posts (Atom)


