Showing posts with label Tips amp; Techniques. Show all posts

Friday, April 27, 2012

FUN FRIDAY! - Doodle Inspiration

 I seem to have somehow 
caught a bug!....

a flippin' great dose of 
DOODLE BUGS that is!

Oooooer! I forgot how therapeutic these were!
And with a little bit of colour here......


And a little bit there.....
they can look amazing!


Check out those quirky heart flowers!


Painting with colour 
makes all the difference....
and brings it all to life!

Doodles are easy, quick and
 a fun and funky way
to wind down and relax...

Plus you can use them for all sorts of other crafts,
from card making to scrap booking.

Try it.... once you start you can't stop,
and the ideas will flow and grow.

Happy creating.

Any questions?
please leave a comment :o) 

Wednesday, April 25, 2012

Painting Collage Doodles - Autumn Leaves

I don't know what got me thinking of Autumn,
when I love and look forward to Summer so much. 

Perhaps it was the colours in the scarf I was wearing
But then someone shared this on Facebook.

Which sent me to this Pinterest Page
and I was inspired to pick up those pens 
and water brush, and have a little play.

As I've been telling myself for a long time,
I really must get round to making an Art Journal,
I thought I would at least draw and paint 
some Doodle Leaves
to perhaps add to the front.


Then I got to thinking 
that I could, if I made a few of these
and cut them out....
make some sort of collage.
for the front.....

And here's the little pile I created...


I think they'll look fab on a book....


Then I took the design and added to it....
My art Journal seemed appropriate
and encouraging,
at least it's a start......

And of course.... ever the eternal caution filled Pixie,
I scanned and printed a couple out, just in case...


If I don't use them,
 I'm sure I can find someone else that will


And I'll probably add some of those loose leaves
to make the design even bigger


Tuesday, April 24, 2012

Proving that 3 into 1 does go! ... Confessions of a technophobe!

3 machines:
1 Prints,1 foils,and 1 cuts.

Sometimes I even make myself laugh! I wanted to write this blog post, about experimenting with the machines at the studio and show you how my mind works sometimes. 

It was only after I loaded the pictures in order, that I remembered this post about resisting change and technology  and how I do everything in my power to avoid it like the plague. In fact, I'm one of those that is the last to get anything, not the first... and usually this is because I HAVE to have it in order for things to still work.

After seeing that Blogger was changing to the 'NEW BLOGGER' in April and fearing I would be the last to leave 'Old Blogger' and wouldn't have a clue how to post, add pictures etc. I was extra brave a couple of weeks ago and bit the bullet! 

Then Google kept telling me to upgrade to Google Chrome.... again I resisted, until my hand was forced. 

After being told repeatedly that Facebook was going to change whether we like it or not, I clenched my bum cheeks as I installed, never to be able to return, to the NEW Facebook timeline.

Now all this above may not seem like a big deal, but as a self confessed technophobe who hates change and prefers the comfortable and stable these day, it was one hell of a big deal.

Which brings me to this..... I wanted to blog about my idea of bringing 3 machines I employ on minimum wage, to make one complete thing. These 3 machines are not really designed to work together but the more I did with them the more I wanted to push boundaries. Now that's something I DO like doing.....taking things to their ultimate capacity and beyond....just to see if the techie heads have got the specification sheets right, you understand. 
Anyway....it was then and only then I realised that actually I am more a techie headed geek than I thought I was. 
Are you with me so far? 

I have a laser printer, a foiler and a plotter (which cuts vinyl and card).... 3 machines, bought for very different reasons. Each I have used in their own right..... but what could I do if I worked all 3 together? I had an end product in mind.... I just had to work backwards and see if I could get it to work.

Here's what I did.....

First I used the plotter software adding my design....
. then printed it off......


Then I foiled it....


This is what the sheet looked like. 
Nothing special....it's how I print and foil all my Wedding Stationery


Then back to the plotter software,
in the hope that I had told the plotter where to cut around my design....


It didn't work....
Somehow the trace facility is still open to error 
and there has to be a bit of technical knowledge 
behind the thinking.....

A few buttons later and a quick test cut, showed that this time it did work! 


Here;s a close up so you can see that I have left a border around the image, 
I think cutting on the lines would have made for a long cutting time....


I'm fairly pleased with them and as usual can't resist folding the wings up!
Butterflies just don't look right with flattened wings.


Learning all this has made me feel like an expert......
But the best laugh????
I haven't the foggiest idea how I got it to work!

I guess I'm not as clever as I think I am!!! 
So... back to the drawing board :o)

Monday, July 04, 2011

Cut Letters - It's all such great fun!

Inspired by Script: Cut Letters - It's all such great fun!: "I'm fascinated with the cut letters I can produce and have been playing around with overlapping letters. This is the pre -cut card before th..."

Wednesday, November 11, 2009

Art Techniques - Using Resists

I have so much to blog about I don't know where to start, but as Blogger is playing up and won't let me move my pictures where I want them by dragging and dropping I will have to blog in small parts, over a few separate posts. This first post is about using resists in your Art Work and I'm blogging about this simply because this is what I have been doing today as a way of experimenting.

Firstly there are many things you can use as a resist. Wax is probably the most common medium, but almost impossible to write over afterwards. FW Acrylic Ink is waterproof when dry. The black in particular is good to use if you want to write something then have the wash go over it in a specific way. I decided to try white FW to see what happens.

First write or draw your words....
Ok....so you can't see it...it is Waite on white however. Then paint over your wash.... Here I painted over FW acrylic As you can see the results are pretty awful.
Perhaps I'll try the above with Watercolour and see if that makes a difference.
Next was something that I KNOW is wonderful. Pebeo Drawing Gum (Masking Fluid to the uninitiated) In the past I've used W&N and found it not only difficult to flow from the pen but it awful for getting off afterwards, peeling the paper away with it if the paper has a slightly fuzzy feel, especially the softer papers. Pebeo however is wonderful. You can easily see it on the page as it dries to the most wonderful dark grey.

When dry paint over your wash. and let it dry again....

Rub off the gum (make sure it is absolutely dry as a bone first) and....here we have it....perfect!

The paper stays it's original colour underneath and no rub off.

Tuesday, September 22, 2009

Inktense Idea

Have you ever tried Dewent Inktense Crayons? They're better than the usual Watercolour crayons as the colours are very vibrant.
They're not cheap but come in a large colour range
try some skeleton letters with them then simply wash through with water
WONDERFUL! and so much fun!
This is just an experimental piece to see how the colours act and react. It's not meant to be a serious piece.

Friday, September 18, 2009

For the Love of LeTTeRing ArT

I've been busy playing with those letter! I seem to have got an idea and I'm doing it to death. So often creativity dries up, the fear that you will never make anything or create anything ever again swirls around your head. Then it's time to rest, relax, let ideas gestate.... and eventually something emerges.

I have written out a series of 'positive' words and small quotations, scanned them and wondering if there is a market out there for mixed media artists or creative folk (perhaps card makers or collage) to use these on their own art work. Perhaps printed out on canvas, acetate, cards, paper, transtrace, rubber stamps? Such words as Dream, laugh, clarity, humor, love, pleasure, fulfil.....

A play with letterforms and different pen, both fine line and broad edged, can lead to finished pieces. I think I need to reconnect with the freedom I felt when I first saw Lettering Art as opposed to Formal Calligraphy for the first time. Ahhh the wonder of those letters which come alive on the page.....
Where this will lead and for what reason is a mystery, and I'll post regular updates on my blog.

Tuesday, September 15, 2009

Lively Lettering Art and Creative Calligraphy

Generally most calligraphy tutors start to teach calligraphy using skeleton letters. These letters are useful for starting beginners off to show them the underlying structure and path that their pens will eventually travel. It also takes the pressure off beginners having to tackle not only a broad edged nib, bottles of ink, unpredictable reservoirs and a multitude of other things that can affect their beautiful letter forms. Once mastered, using a broad edged nib becomes a pushover.

Formal styles of lettering are one thing, but there comes a time when the calligraphy with it’s tight structure and letterform needs to break free.

I started to mess about with first a fine line pen, making the letters quirky, but still with some underlying structure to them…’Playful Pen Letters’
A few days later I built them up slightly using a broad edge pen. I’ve done this with capitals and with lowercase letters and Oh what FUN I’m having!
As with most things that I get my teeth into I want to do this idea to death and will build up on these letters, see what works, discard what doesn’t and see where it takes me. I’ll keep you posted.

Thursday, August 13, 2009

How To Make A Concertina Book or Accordion Style Book

I've been commissioned or had to make quite a few Concertina Books (also known as Accordion Style Books) lately and thought it was about time I shared with others how easy and effective these books can be made. Their uses are wide and varied and are a useful addition to your crafting repertoire.

So here goes.......

Firstly create your art on a long, thin strip of paper
Then fold the strip in half and then each half in half again.
You will need a minimum of 4 pages...ie - In half and half again.
This book is actually 8 pages, but you can make it as long as you want with as many equal pages as you want, as long as the number is an EVEN one.

Face on, your concertina will look like this
Fold the concertina and measure the size of the pages. You will then need to cut 2 pieces of card (cereal box or similar is good) and make the boards 1cm higher and 1cm wider than the folded book.
Then you need to cut your cover paper
about 1.5cm larger all round and a long piece of ribbon.
Stick the card to the cover paper and then cut the corners at a 45 degree angle, then glue each long edge to the board first
and then the glue the short edges.
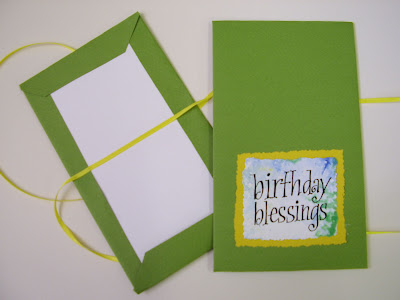
Fold the length of ribbon in half and glue it to the middle of one of your boards (this is the BACK)
You can decorate the front board either now or later....

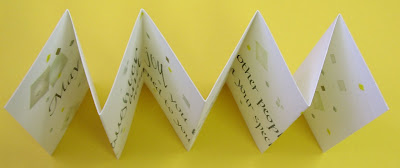
Then glue the last page of the concertina book to the back cover leaving a 0.5cm border all round and press heavily.
Then glue the top cover onto the front page lining up
with the back cover underneath.
And there you have it.....far simpler than the instructions seem

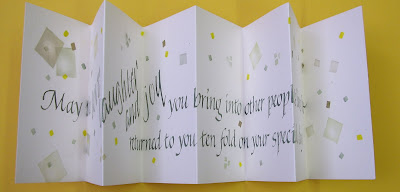
Here are 2 Astrology Concertinas made as Baby Birth Celebrations....


And a Birthday Concertina

If you have any questions or are not sure about something please leave a comment and I'll answer ASAP.

Thursday, June 11, 2009

Power Pebbles - Hope, Joy, Love and Peace

Hope, Joy, Love, Peace
Just 4 examples of my Power Pebbles
The journey that each human being makes through earthly existence can have hardship as often as it is touched by joy. When we encounter adversity, the stress we feel can erode our optimism, eventually convincing us that the issues we face cannot be overcome. In truth, there is no situation so dire, no challenge so great, and no choice so bewildering that it cannot be overcome. Though we may believe that all avenues have been closed to us or that our most conscientious efforts will come to naught, we are never without feasible options. The best course of action may be veiled in doubt, but it is there. When we are honest with ourselves with regard to this simple fact, we can overcome anything because we will never stop looking for a solution to the challenges before us.

Self-trust coupled with a sturdy plan is the ultimate antidote to adversity’s tendency to inspire disillusionment in the human mind. As difficult as the obstacle plaguing you seems, it is no match for the love of a supportive universe that has been a part of your life since the day of your birth and will be with you forevermore. Try not to be misguided by your fear as this gives rise to the notion that there are problems without solutions. If you believe in your capabilities and dedicate yourself to the creation of some form of resolution, you will be surprised to discover that paths that were once closed to you miraculously open. Even if all you can do is change your perspective to turn an impediment into an opportunity to grow, you will have found the hope that is an inherent element of all hardship.

Remember that your destiny is a product of your own creation. Even when it seems you have nowhere left to turn, there is a solution waiting for you. The only insurmountable obstacles are the ones you create in your own mind—and these can only exert power over you if you let them. Uncertainty will always be a part of your existence, but perseverance and mindfulness will never fail to see you through to the other side of hardship where joy can thrive. Try and remember that no matter what life places at your feet, there is absolutely no situation that cannot be resolved with time, love, and friendship.

Namaste
(The light within me honors the light within you)

Monday, March 09, 2009

Working With The Elements

Very often when you work closely with another creative person, you end up coming together with very similar ideas and an awful lot of synchronicity goes on. Sue (the other one) and I have been talking about all sorts of spiritual matters and insights that we seem to get almost at the same time. I’ve blogged about this before and said how very often you manage to find that other people on different blogs work in synchronicity as well. Now if you (like me) believe that what you put out there makes a difference, then a simple thought process that you think is your own can be connecting in some way with others on a much higher level. It can’t be explained by simple ‘co-incidence’, I think it’s more a case of those who are spiritually awake versus those who are asleep.

We talk about many things when we get together, most of which I do not blog about here, unless it becomes so important that I can’t keep my mouth shut any longer! Lol. Lately we have been talking about The Elements, the effects on our lives, the turning of the wheel and the connections we make with that in our own lives. We are also members of a couple of groups with like minded people and its comforting when things come up soon after we have talked about them. Others obviously have similar insights to us. This year I knew the big words would be ‘Change’ and ‘Connections’ and I’ve certainly had some wowzer of dreams and visions to do with change. My innermost personal thought, I keep to myself and are put on a separate private blog. It would probably frighten the pants off most people if they read what I had to say. Time will out as they say.
Anyway, the Elements and in particular water, is something Suzanne and I are working on. I wrote these words out as titles to articles we intend to write…. Here they are in black and white, ready for reproduction.


LinkWithin

Related Posts Plugin for WordPress, Blogger...